If you anticipate that the prices of various resources will change in a specific way over time, you can create a resource price forecasting framework to model that. The framework allows you to view the forecasted resource price and corresponding financial savings alongside the actual resource price and financial savings listed in each project’s Annual Tracking Data table. Access this section by clicking the Resource Price Forecasting sub-tab on the Settings page.
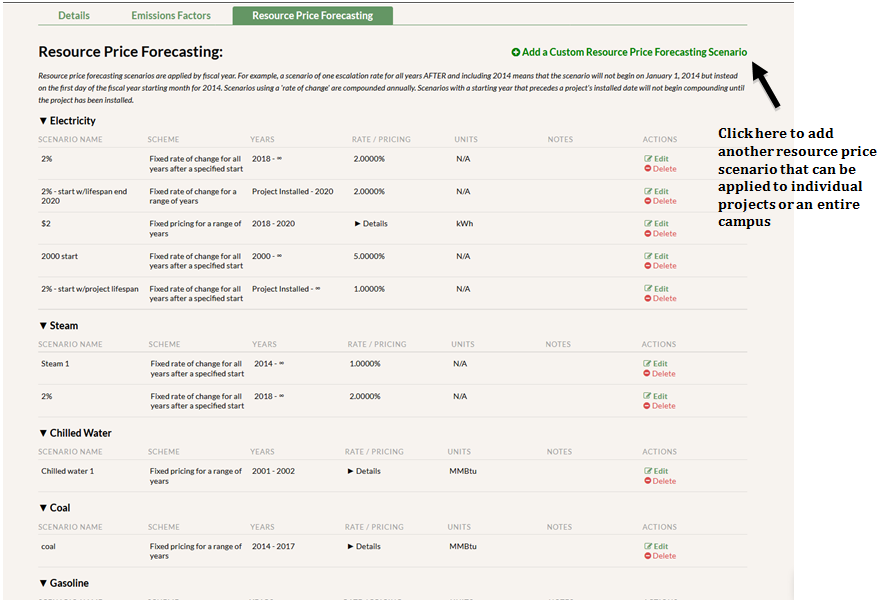
- Add a Resource Price Forecasting Framework
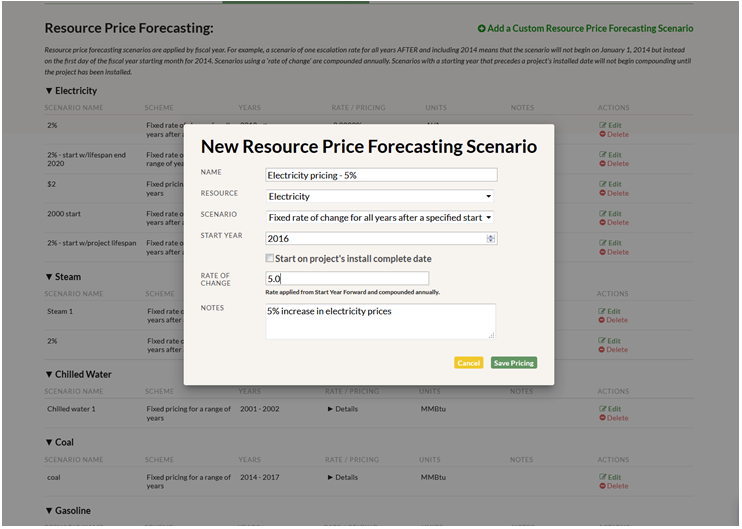
- Click “add a custom resource price forecasting scenario” and fill in the pop-up form. First, enter a name for the resource price forecasting framework. Next, select the resource type. You then have a choice of three frameworks that allow you to customize how your resource price forecasts will be applied:
- Fixed rate of change for all years after a specified start: This framework increases or decreases your starting resource price by a fixed percentage (i.e. 5%) for all years following a designated starting year. You can also choose to start the framework on each project’s install complete date by checking that box.
- Fixed rate of change for a range of years: This framework increases or decreases your starting resource price by a fixed percentage (i.e. 5%) for a range of years. You can either enter a starting and ending year or choose to start the framework on each project’s install complete date and end it at the finish of each project’s lifespan by checking those boxes.
- Fixed pricing for a range of years: This framework sets a fixed amount as your forecasted resource price over a range of years. Select the unit of measurement for your resource (i.e. kWh for electricity), then enter the forecasted cost per unit.
- Click “add a custom resource price forecasting scenario” and fill in the pop-up form. First, enter a name for the resource price forecasting framework. Next, select the resource type. You then have a choice of three frameworks that allow you to customize how your resource price forecasts will be applied:
- Edit or Delete a Resource Price Forecasting Framework
- You can change the settings on a resource price framework by clicking the “edit” button in the last column of the framework table. The changes you make will automatically be applied to the projects and campuses modified by that framework.
- You can delete a resource price framework by clicking the “delete” button in the last column of the framework table.
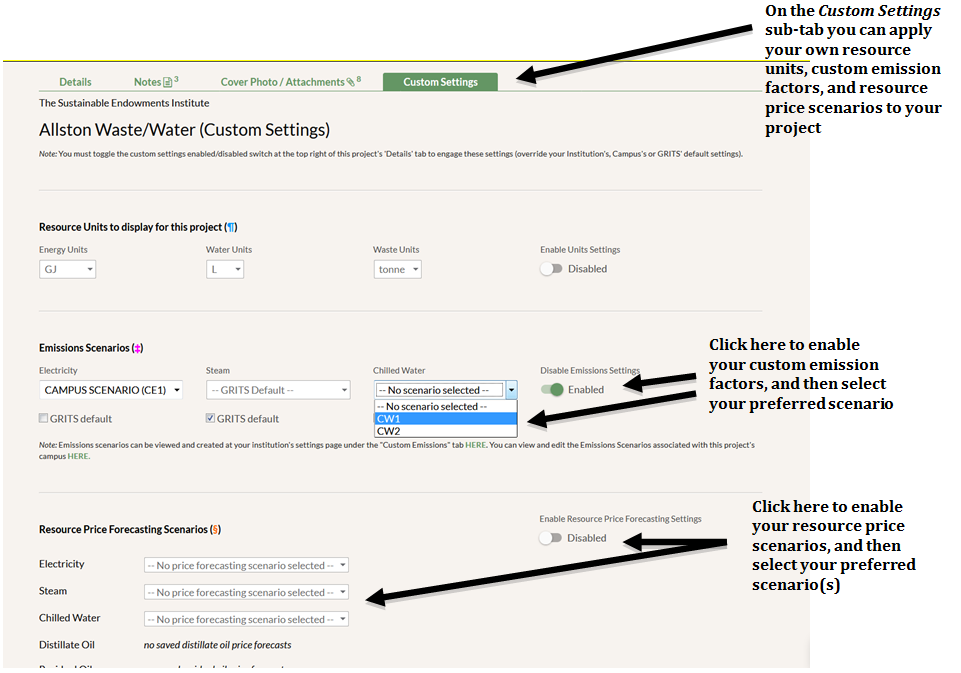
- Applying the Resource Price Forecast on a Project-by-Project Basis
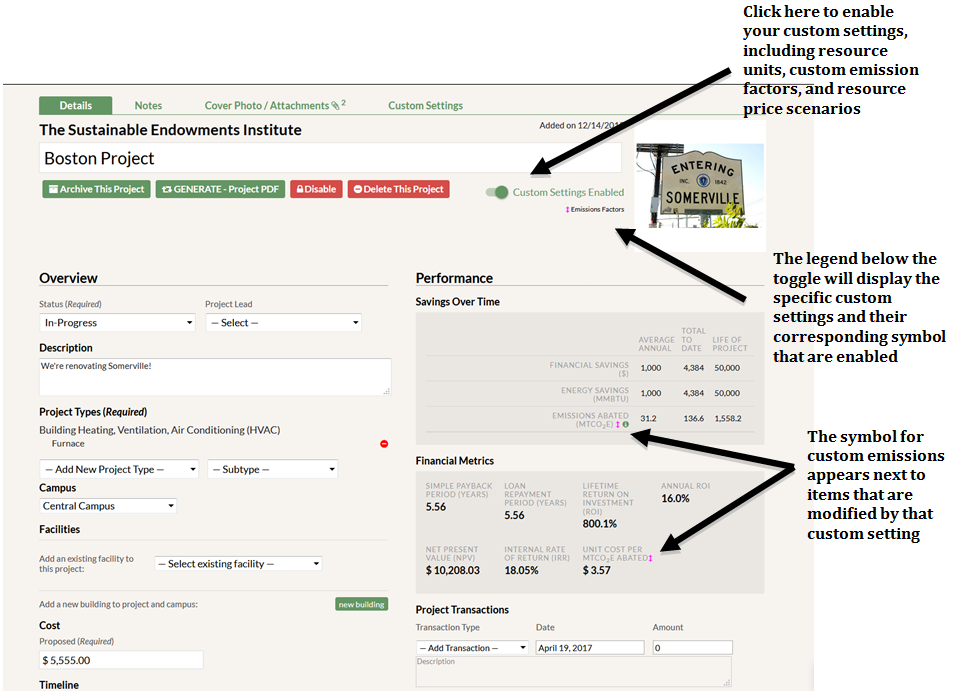
- After creating a resource price forecasting framework, you can apply it to individual projects. First, click on the Projects tab and enter the project you’d like to modify. Next, click on the Custom Settings sub-tab and click the slider to enable resource price forecasting. Select the resource price forecast to apply from the dropdown menu. Return to the Details sub-tab and click the slider to enable custom settings, which is located on the top-right corner of the page.
- Resource price forecasts modify the Annual Tracking Data table. When resource price forecasts are enabled, a “§” symbol will appear next to the table and the forecasted data.
- Note that for projects with multiple saved resources of the same type that are targeted by an applied price forecasting framework (e.g. a project using an electricity price forecast that happens to list electricity savings twice, perhaps to account for two different cost per kWh figures), the forecast will be applied to each of the relevant resources. For renewable energy projects that save and replace the same resource (e.g. a solar energy project that both generates electricity and replaces electricity), the forecast framework will be applied to both resources (though in the solar energy example, the generated electricity resource likely has a price of $0/kWh and would not technically be affected by the forecast).
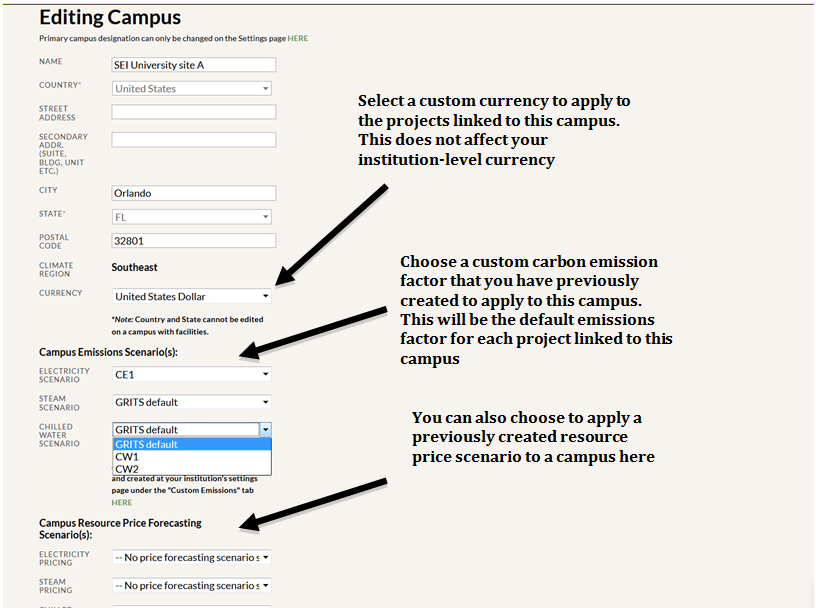
- Applying the Resource Price Forecast to a Campus
- You can also apply resource price forecasting frameworks to a campus, which will modify all projects linked to that campus. First, click on the Facilities tab and then on the Campuses sub-tab. Click “edit” on the campus you’d like to modify. Next, select the forecast to apply from the resource price dropdown menu. You will only see menus for those resources for which you have created a resource price framework. Hit the “save” button.
- Campus-based resource price forecasts are automatically applied to all projects linked to that campus without switching on custom settings on your Project Details pages.
- You can override the campus-based resource price forecast for individual projects via their Custom Settings sub-tab. Just follow the instructions in the previous section for applying a forecast to a project.
- If a resource price forecast is currently applied to a project through its campus, you will see a note about it appear under the Annual Tracking Data header on the Project Details page and a separate note with the name of the campus-level price forecast below the dropdown menu of price forecasts on the project’s Custom Settings sub-tab. In that menu, the campus-level price forecast will be labeled using the following convention: “CAMPUS SCENARIO (X)” with the price forecast name in place of the X.