You can change the emissions factor used in GRITS for electricity, steam, chilled water, heat, waste, or natural gas. This feature allows for a more accurate aggregate carbon dioxide equivalent emissions (CO2E) savings number at your institution, especially if the institution does not purchase 100% of its electricity from the standard electric grid. Access this section by clicking the Emissions Factors sub-tab on the Settings page.
- GRITS Defaults
- The default carbon equivalent emissions factors (measuring carbon dioxide, methane, and nitrous oxide) are listed here for electricity (which depends on the location of the campus), as well as for steam and chilled water (which are not based on geographical region).
- A different default for electricity emissions factors will be viewable for each campus that is situated in a different geographical region. If you have only one campus, you will only see one region for electricity emissions factors.
- GRITS incorporates historical electricity emissions factors into its carbon savings calculations. Where data is available for past years, GRITS uses electricity emissions factors from that period for projects completed in the past. These historical factors are applied by calendar year, so a factor listed from 2005-2007 would apply to the portion of a project’s lifespan between 1/1/2005 and 12/31/2006. Historical emissions factors can be viewed here or via the “historical emissions conversion table” link above the GRITS Default Emissions Factors table.
- U.S. electricity emissions factors are sourced from the Environmental Protection Agency’s (EPA’s) eGRID, determining each campus’s grid mix based on its U.S. zip code.
- Important note for U.S.-based users: The EPA provides different electricity emissions factors, one used for establishing an institution’s carbon footprint (called “total output” factors) and another that is meant to be used for calculating the carbon savings from projects that reduce electricity consumption (called “non-baseload” factors). There is often a significant difference between the total output and non-baseload factors for each U.S. region. Guidance from the EPA suggests using the non-baseload factors to calculate the project-level carbon savings shown on each Project Details page and using the total output factors to calculate the project-level carbon savings when adding projects into a carbon footprint-reducing scenario in GRITS Goals. In GRITS, those are the default settings. If you would like to use the total output factors in both places to standardize your electricity projects’ carbon savings calculations, flip the switch that appears above the GRITS Default Emissions Factors table.
- Canada’s electricity emissions factors are sourced from the Canada National Inventory Report and are province-specific.
- Australia’s electricity emissions factors are sourced from the Australian government’s National Greenhouse Accounts Factors. Of the two electricity grids listed for Western Australia, we use the factor for the Southwest Interconnected System. In the Northern Territory, institutions located in Darwin and Katherine use the Darwin-Katherine Interconnected System factor and all other Northern Territory institutions use the other listed factor.
- New Zealand’s electricity emissions factor is sourced from the New Zealand government’s Ministry for the Environment.
- The U.K. electricity emissions factor is sourced from the U.K. government’s Department for Business, Energy & Industrial Strategy.
- Ireland’s electricity emissions factors are sourced from the carbonfootprint.com Country Specific Electricity Grid Greenhouse Gas Emissions Factors list, which aggregates official factors.
- Japan’s electricity emissions factors are sourced from the carbonfootprint.com Country Specific Electricity Grid Greenhouse Gas Emissions Factors list, which aggregates official factors.
- Poland’s electricity emissions factors are sourced from the carbonfootprint.com Country Specific Electricity Grid Greenhouse Gas Emissions Factors list, which aggregates official factors.
- Singapore’s electricity emissions factors are sourced from Singapore’s Government Energy Market Authority.
- Switzerland’s electricity emissions factors are sourced from the carbonfootprint.com Country Specific Electricity Grid Greenhouse Gas Emissions Factors list, which aggregates official factors.
- The default emissions factors for purchased steam and purchased chilled water are the same as those used in SIMAP (https://unhsimap.org/, formerly CarbonMAP), and assume that these resources were produced using 50% natural gas and 50% distillate oil.
- Emissions factors for fuels in GRITS, such as coal or distillate oil, are listed here. GRITS sources all fuel emissions factors from the U.S. government mandatory reporting rule factors.
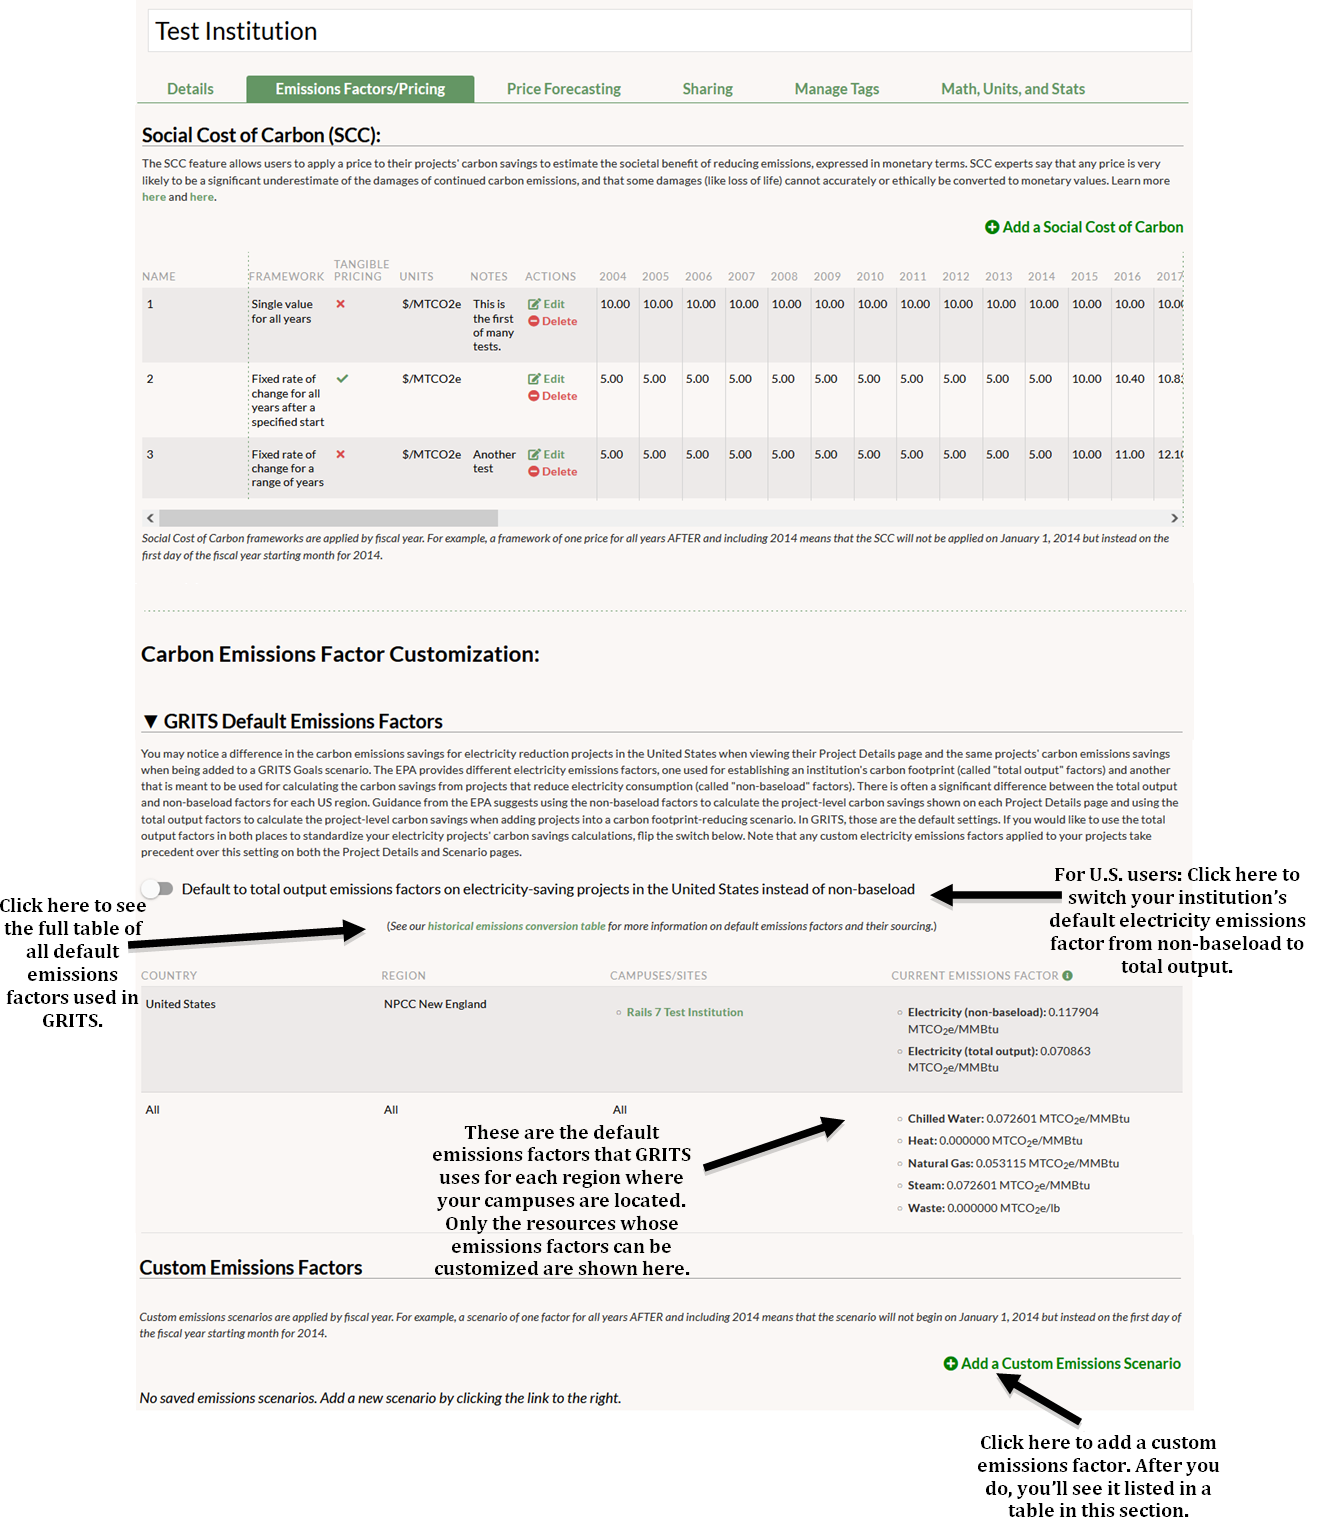
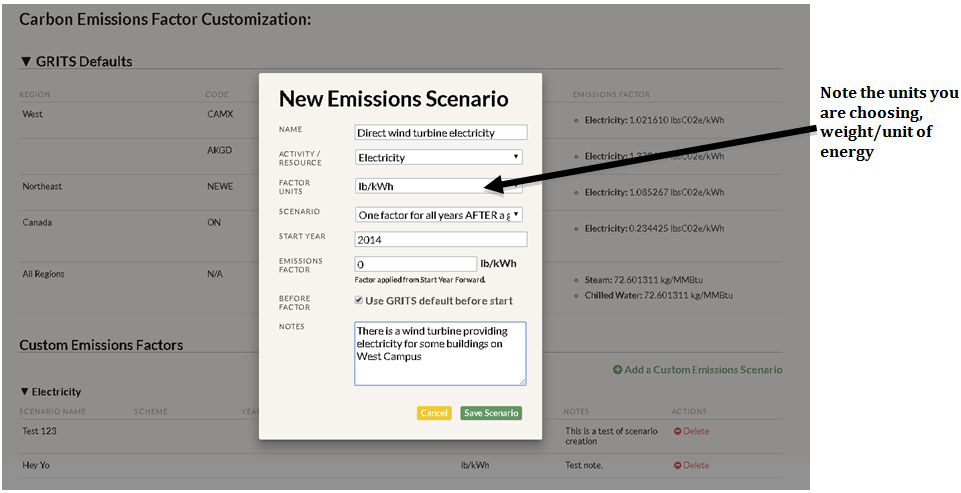
- Add a Custom Emissions Factor
- There are various reasons why your carbon emissions factors may differ from GRITS’ defaults, such as having a cogeneration plant which provides electricity and steam for your campus, and thus you do not purchase electricity from the grid.
- Click “add a custom emissions scenario” and fill in the pop-up form. First, enter a name for the custom emissions factor framework. Next, select the resource type. Then choose the units you’ll use to express the quantity of CO2E being saved per unit of that resource. You may want to consider the units you typically enter into GRITS for projects that save the resource you selected (i.e. consider selecting lb/kWh or kg/kWh for electricity if you typically enter electricity-saving projects in kWh). You then have a choice of five frameworks that allow you to customize how your custom emissions factors will be applied:
- One factor for ALL years: This framework applies your custom carbon emissions factor to an entire project lifespan.
- One factor for all years AFTER and including a given year: This framework applies your custom carbon emissions factor from a certain year forward. For example, entering “2014” and applying this framework to a project would replace the project’s default emissions factor starting in 2014 until the end of its project lifespan. Projects completed after 2014 that are modified by this framework would have the custom emissions factor apply for their entire project lifespan.
- One factor for all years BEFORE a given year: This framework applies your custom carbon emissions factor for all years up to the year you enter. For example, entering “2014” and applying this framework to a project would replace the project’s default emissions factor for every year of its lifespan before 2014. Projects completed before 2014 that are modified by this framework would have the custom emissions factor apply for their entire project lifespan.
- One factor for a RANGE of years: This framework allows you to apply a single custom factor for a series of years, rather than extending infinitely in either direction like the previous frameworks.
- Variable factors for a RANGE of years: This framework allows you to apply different custom emissions factors for each year over a series of years.
- Edit or Delete a Custom Emissions Framework
- You can change the settings on a custom emissions framework by clicking the “edit” button in the last column of the framework table. The changes you make will automatically be applied to the projects and campuses modified by that scenario.
- You can delete a custom emissions framework by clicking the “delete” button in the last column of the framework table.
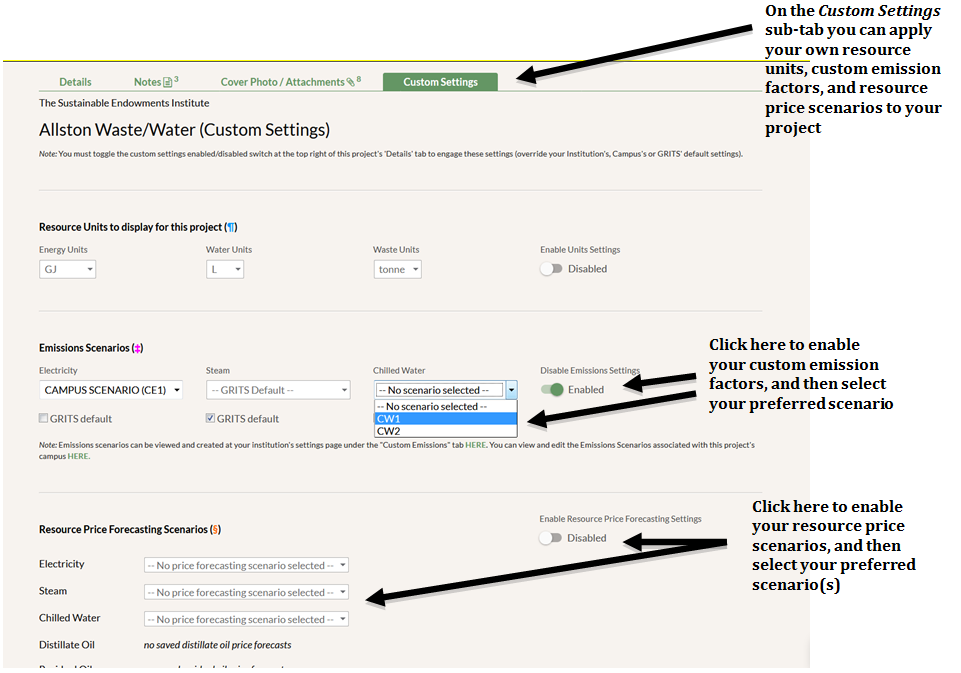
- Applying the Custom Emission Factor on a Project-by-Project Basis
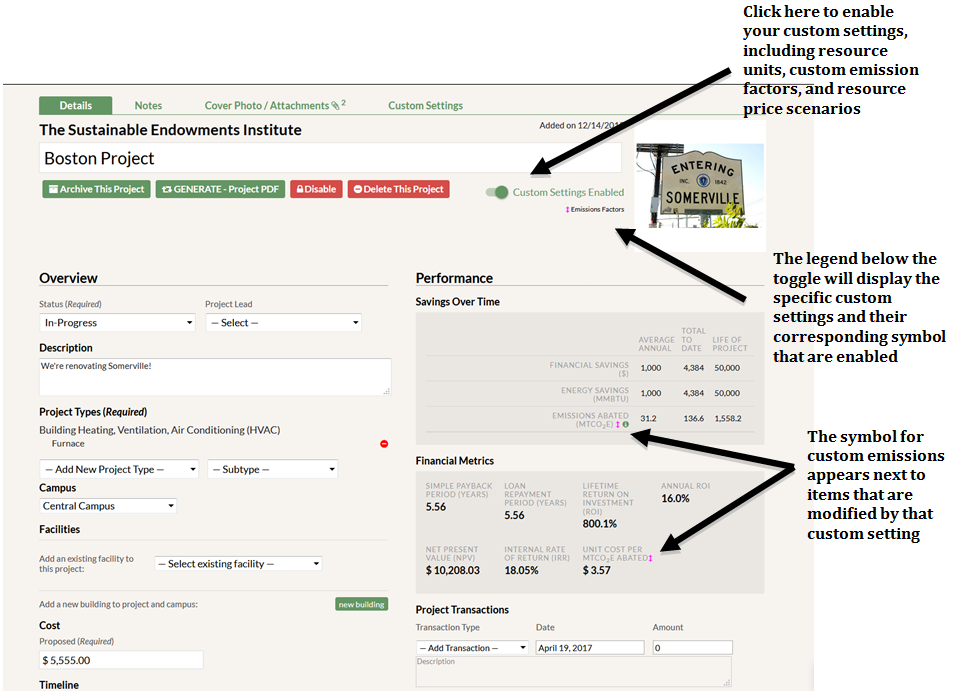
- After creating a custom emissions factor, you can apply it to individual projects. First, click on the Projects tab and enter the project you’d like to modify. Next, click on the Custom Settings sub-tab and click the slider to enable emissions factors. Uncheck the GRITS default box below the resource you’d like to modify, and select the custom emissions factor to apply from the dropdown menu. Return to the Details sub-tab and click the slider to enable custom settings, which is located on the top-right corner of the page.
- Custom emissions factors modify the emissions abated metric in the Savings Over Time table and the unit cost per MTCO2E metric in the Financial Metrics table. When custom emissions are enabled, a “‡” symbol will appear next to these items.
- Note that for renewable energy projects, the generated resource has its own unique emissions factor (set up in the “Emissions Factor” field) and is not affected by the custom emissions factor that would otherwise target that resource. For example, if a solar project’s generated electricity resource is set to 0 kgCO2E/kWh, that figure would not change if a custom electricity emissions factor is applied to the project.
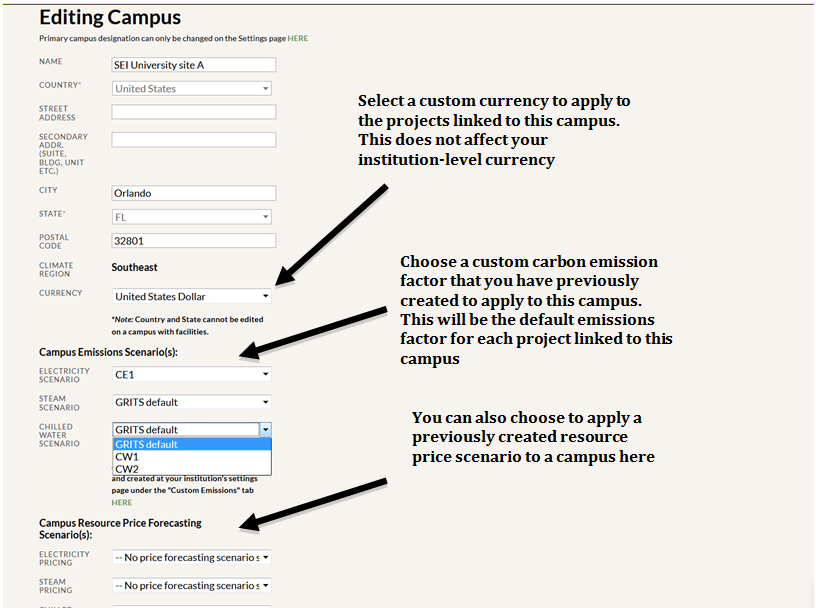
- Applying the Custom Emission Factor to a Campus
- You can also apply custom emissions factors to a campus, which will modify all projects linked to that campus. First, click on the Facilities tab and then on the Campuses sub-tab. Click “edit” on the campus you’d like to modify. Next, select the factor to apply from the custom emissions dropdown menu. You will only see menus for those resources for which you have created a custom emissions factor. Hit the “save” button.
- Campus-based custom emissions factors are automatically applied to all projects linked to that campus without switching on custom settings on your Project Details pages.
- You can override the campus-based custom emissions factor for individual projects via their Custom Settings sub-tab. Just follow the instructions in the previous section for applying a factor to a project.
- If a custom emissions factor is currently applied to a project through its campus, you will see a note about it appear under the Savings Over Time box on the Project Details page and a separate note with the name of the campus-level custom emissions factor below the dropdown menu of emissions factors on the project’s Custom Settings sub-tab. In that menu, the campus-level custom emissions factor will be labeled using the following convention: “CAMPUS SCENARIO (X)” with the framework name in place of the X.